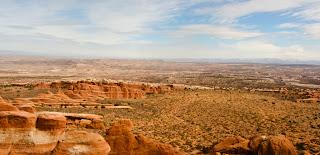
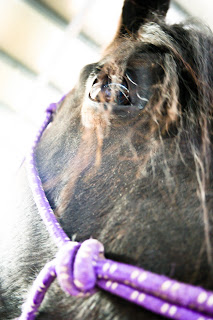
photo 1:
Taken in Lander, WY.
-ISO400, f/3.5, 1/4sec
-Increased clarity, contrast and vibrancy
-brought down the darks and shadows on the tone curve, and brought the highlights up a little just to make the outside world pop a little more.
-sharpened a little to bring just a bit more detail forward
-added a vignette because the left side of frame was a little darker. Wanted to even it out little more
photo 2:
Taken just outside of Lander.
-ISO400, f/6.3, 1/3200sec
-cropped it on the sides to get rid of a few spots in the snow, and down on the top get the fence out as well
-boosted the contrast
-brought the darks and shadows down to get a little more dynamic against the snow background.
photo 3:
Taken in Arches National Park
-ISO100, f/6.3, 1/80sec
-graduated filter on top to dim the light up a little
-graduated filter on bottom to light him up more
-brought up contrast and vibrancy to make him pop a little more
-dropped the darks and shadows down to add just a little more to him, make sure your focus starts on him
Photo 4:
Taken in Arches National Park
-ISO100, f/8.0, 1/200sec
-played with tone curve, to bring more intensity to the scene and not so bland, desert like
-intensified the saturation of some of the colors like the orange and green to get a little more contrast in colors
photo 5:
Taken in Arches National Park
-ISO100, f/10, 1/250sec
-again, adjusted the tone curve, basically the same as others
-brought exposure and fill light up a little to bright the arch up
-brought up highlight recovery to get a little more detail in the background through the clouds
-brought up the saturations on some of the colors like the blue and orange
photo 6:
Taken in Arches National Park
-ISO100, f/10, 1/250sec
-cropped top down to get rid of some sky, even it out a little
-boosted vibrancy and contrast to make it more intense
-spot removal in the sky on a couple spots
photo 7:
Taken at one of the highest points in devils garden-Arches National Park
-ISO100, f/11, 1/250sec
-warmed it up a little and boosted clarity
-graduated filter over sky to darken it up a little and get more mountain detail
-played with saturations of colors
-Tone curve, to make it pop
-added some contrast
photo 8:
Taken at Red Rocks Canyon
-ISO400, f/13, 1/400sec
-highlight recovery to get a little less reflection coming off her
-tone curve to make her pop out at you more
-saturated some colors, and sharpened a little
-cropped it down some to get rid of some background
-cloned a car off the road behind her head
photo 9:
Taken at Red Rocks Canyon
-ISO400, f/8.0, 1/320sec
-cropped it in on the sides
-boosted contrast
-played with the red, orange and yellow saturations
-sharpened it some
-added a fairly strong vignette to center him
photo 10:
Taken at Red Rocks Canyon
-ISO400, f/10, 1/400sec
-straighten the image some to get more vertical lines running through it
-dropped exposure a little to get less reflection off the rocks
-warmed up the temperature just a little
-played with tone curve
-messed with the saturation of the colors
-added a vignette. really works with the image
photo 11:
Taken in Zion National Park
-ISO100, f/8, 1/125sec
-converted image to black & white
-Cropped up the bottom just a little, and changed the angle little as well
-boosted the contrast and clarity some
-brought down the darks and shadow tones and brought up the highlights some to intensify the light of the sun a little more
photo 12:
Taken in Zion National Park
-ISO100, f/9, 1/160sec
-warmed it up a little, and boosted contrast
-played with the saturation of the orange, reds, yellows and greens
-played with tone curve
-added a small vignette
photo 13:
Taken at the top of Zion National Park
-ISO400, f/8, 1/640sec
-played with the saturation of the colors
-boosted contrast and clarity
-played with the tone curve
-dropped exposure just a little to get more detail in the sky
-reduced the noise some
photo 14:
Taken on BLM, while canyoneering
-ISO400, f/18, 1/125sec
-adjusted angle a little and cropped up bottom a little bit
-boosted clarity and vibrancy a little bit
-played with tone curve
-reduced the noise just a little
photo 15:
Taken in same spot
-ISO400 f/18, 1/100sec
-cropped in the sides and the top a little, and adjusted angle
-played with saturation of the colors
-boosted the contrast and clarity
-messed with the tone curve
-played with the luminance of the colors as well
-sharpened just a little
photo 16:
Taken in a slot canyon
-ISO200, f/5.6, 1/20sec
-boosted contrast and clarity a bit
-played with the tone, to get the shadows to stand out more
photo 17:
Taken in same area
-ISO100, f/10, 1/160sec
-played with saturation of colors
-boosted contrast some
-boosted clarity
-played with tone curve
photo 18:
Taken leaving Zion
-ISO100, f/6.3, 1/80sec
-boosted contrast, clarity, and vibrancy
-played with tone curve
-messed with the saturation and luminance of the colors
photo 19:
Taken on way to Snow Canyon State Park
-ISO100, f/5.6, 1/200sec
-boosted contrast
-played with saturation of colors
-dropped exposure just a little to get more of the mountains in the bckground
-played with the tone curve
-adjusted angle of image a little
photo 20:
Taken in Snow Canyon State Park
-ISO200, f/11, 1/500sec
-warmed it up a little
-boosted contrast, clarity and vibrancy
-played with saturation of the colors
-played with the tone curve
-dropped exposure a little
-adjusted angle of image a little
-added a vignette
photo 21:
Taken at the Grand Canyon
-ISO400, f/14, 1/400sec
-cropped left side to make tree frame image
-did a little spot removal
-played with saturation of colors a bit
photo 22:
Taken on ride home
-ISO400, f/4.5, 1/13sec
-adjusted angle some
-dropped exposure just a little
-added highlight recovery quite a bit
-boosted contrast, clarity and vibrancy a little
-played with tone curve
-added a small vignette
photo 23:
Taken at equestrian center
-ISO400, f/3.5, 1/50sec
-brought up exposure
-warmed it up some
-boosted contrast and clarity
-played with tone curve
-removed a little noise
photo 24:
Taken at equestrian center
-ISO400. f/3.5, 1/5sec
-boosted contrast, clarity, vibrancy
-played with tone curve
-boosted saturation a little
-added a small vignette
photo 25:
Taken at equestrian center
-ISO400, f/4. 1/6sec
-cropped right side in a little
-boosted clarity, vibrancy and contrast
-played with tone curve
-sharpened some
photo 26:
Taken at equestrian center
-ISO200, f/10, 1/500sec
-adjusted angle of image
-converted to black & white
-played with tone curve
-added graduated filter over sky to darken up just a little
photo 27:
Taken on the way to mystic lake
-ISO400, f/16, 1/640sec
-boosted contrast, clarity, and sharpening
-played with tone curve
-saturation and luminance of colors
photo 28:
Taken up in mystic lake area
-ISO200, f/11, 1/250sec
-converted to black & white
-boosted clarity
-played with tone curve
photo 29:
Taken in same spot
-ISO200, f/14, 1/400sec
-warmed it up a little
-boosted contrast, clarity, vibrancy and sharpening
-messed with the tone curve
-played with the saturation of colors
photo 30:
Taken in same spot
-ISO200, f/14, 1/320sec
-boosted contrast, clarity and sharpening
-played with tone curve
Tuesday, April 26, 2011
Monday, April 25, 2011
Tuesday, April 19, 2011
portrait 2-In color
This was taken in the afternoon, and the sun was coming from behind me, shining directly on her face. As you can see form the sky, there were very few clouds, so it was really bright out and the light was more direct instead dispersed for an overall brightness. The picture itself isn't that great of a portrait shot because of the background, so I added a vignet to it to try and bring the focus to her better. I like this picture though because if you know jill thats how she always is, so its more of a genuine photo and not so much a fake or posed shot. Again, the vignetting helps start the focus on her and not the background, and the background has a slight blur to it which helps as well. The sky is pretty prominent so your eye instantly wants to travel up from her face. Since the light is coming directly at her there's not really any shadows being cast other then from the hair in her face.
Wednesday, April 13, 2011
Portrait 1
I took this picture up at the equestrian center in the afternoon. The sun was setting off to the west, and I liked the sunlight coming into the side of her face more so than directly on her face. I think this helps show off more of what type of light I was using for the photograph. Obviously, you can see the light lighting up the right side of her face and her hair on that side. But it was such a clear bright day that there was also sunlight reflecting off a cars and other objects. You can see this because the left side of her face isn't completely shadowed; there's light reaching it. I tried to lighten up the eyes a bit, but she was squinting and she has dark eyes to begin with so it was pretty difficult. I also bumped up the contrast, clarity, and luminance of the noise reduction up a bit. I then used the spot removal tool to get rid of a few freckles that were standing out enough that they were bothering me. The last thing I did was cropped the bottom and the right side some to get rid of some unnecessary background, and make sure the attention is focused on the subject.
Wednesday, April 6, 2011
Portraits
This link is to BEL portraits. Their a photography business in the town where I'm from. Bernie is a super nice guy and I love his work, especially in the senior photos album. It's really interesting the different ideas in there. There's a pretty big variety in the photos and I like that a lot.
http://www.belportraits.com/Home.html
http://www.belportraits.com/Home.html
Subscribe to:
Posts (Atom)


